The Ultimate Guide to Crochet Basics (with VIDEO)
Warning: this post is a massive rabbit hole into the world of crochet. It’s 2400+ words. You can cheat and watch the 5 minute tutorial video to get the good stuff fast. I can’t take responsibility for any addictions that may arise. This tutorial assumes you know NOTHING about crochet, and goes through all the tiny details that confused me when I started out.
Already know how to crochet? Advanced tutorials are coming next! Subscribe to the Crafting Fingers YouTube channel to get the latest free tutorials. For now, share this post with a friend and you’ll have the perfect excuse to dig through your yarn stash. I’d love to hear what your first crochet ever was! @craftingfingers
What you’ll learn
- What hooks & yarns to use
- How to get your yarn onto your hook
- How to hold the yarn & the hook
- How to crochet chains
- How to crochet double crochet
- What UK and US crochet terms are
- How to work double crochet in rows
- How to bind off your project
PLUS, I’ve picked 5 free crochet patterns you can make with just the skills you learn in this post.
What you need to get started
- Some yarn or cord
- A crochet hook
Sizes don’t matter at this point. Use what you got if you don’t want to buy! The exception is using small crochet hooks with big thick yarns. You can try, but don’t say I didn’t warn you.
LEARN TO CROCHET IN 5 MINUTES
OK but seriously what hooks go with what yarn?
When you’re learning to crochet, it really doesn’t matter. Yes, I wrote that twice. I’m being serious. You can even crochet with your fingers if you don’t have any hooks. There’s no point wasting money buying ALL THE THINGS if you don’t know if it’s your jam, you know?
BUT if you want to do things all proper like, get to a craft shop. In person. I suggest using baby soft materials like bamboo or quality wools like merino to start with. Get something that’s nice to touch and a bit stretchy so it’s easier to work with. Scratchy yarn will make your fingers sore, no matter how good it looks. Pick something you ache to make with! Then, you’ll find the recommended hook size on the yarn label.
Or, if you’re really eager to get going and you can’t get to a shop soon, you can buy this starter crochet hook & tool set** and this lovely DMC cotton yarn** (use a 3mm or 4mm hook) on Amazon.
(**Linked marked with ** are affiliate links. If you do buy after going through the link I’ll get a tiny commission and you don’t have to pay an extra penny. This helps me continue to make free DIY guides like this one. Thanks for your support!)
Quick tip! Bamboo hooks & yarn needles are “cute”, but they can be difficult to slide yarn over. They also tend to splinter as they wear. I recommend metal hooks. Metal hooks also don’t break if you sit on them. Keep the bamboo sets for cute Insta shots or buy hybrid metal & bamboo hooks.
How to secure the yarn to your crochet hook
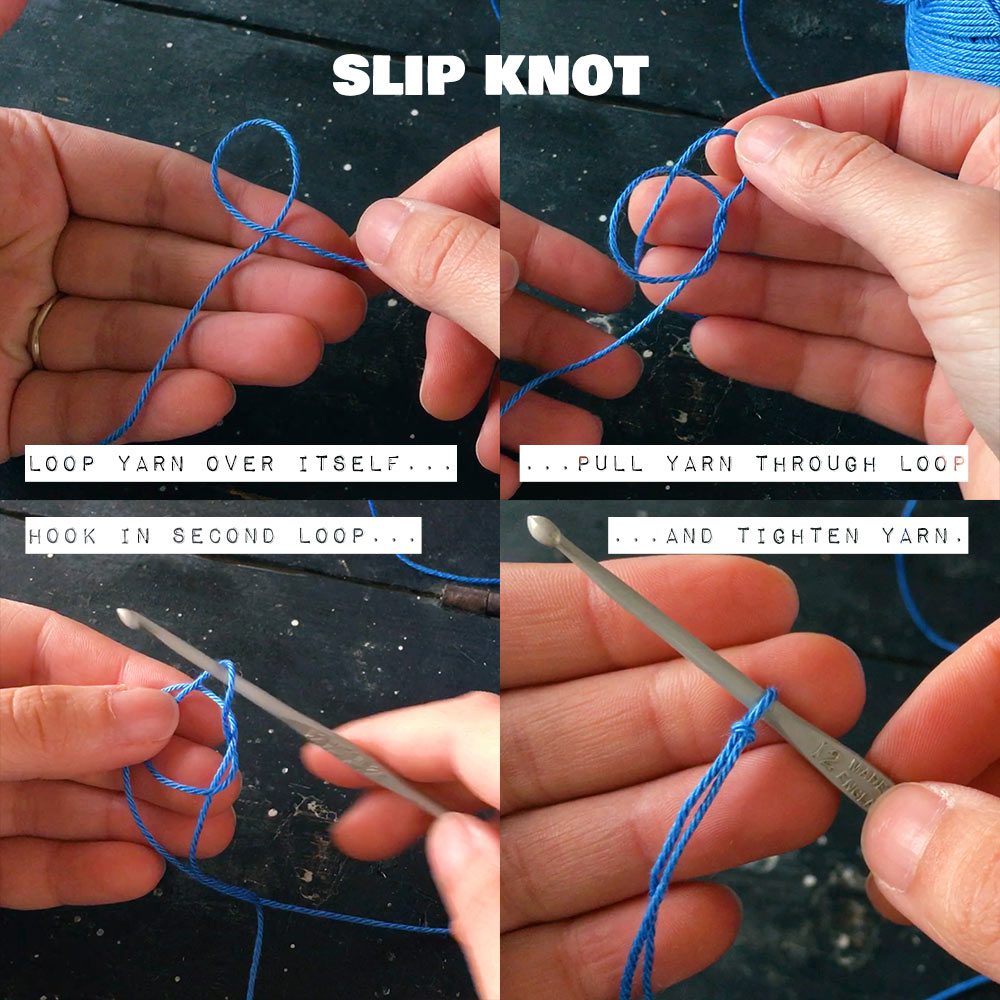
Slip knot was a practical and vital skill in cute crafts WAY before the band ever existed.
Knots make more sense if you watch it then try to read it. It’s like tying a simple knot, but instead of pulling the working yarn all the way through, you stick the hook in the way and it makes a neat little knot.
So why a slip knot? This is a simple yet incredibly clever technique. By tying the yarn this way, pulling on the “tail” at the start of the work will not tighten the stitches. Only by pulling on the “working yarn” can you manipulate the stitch work. This makes a tidy, secure knot that won’t mess up your jazzy masterpiece.
Watch at 00:44:26 in the video
How to hold the yarn when you crochet
Once you’ve made a slip knot, it’s time to figure out how to hold the yarn and manipulate it with your hook. Just take your time, and if your hand starts to cramp take a little break.
You want to hold the yarn over one finger with some tension. There are many ways of doing this, and it all depends on your hands. My preferred way is to use my ring and pinky fingers to pinch the working yarn to my palm, then my index finger acts like a pulley by stretching out the yarn to give it tension before it reaches the hook. Tension makes the yarn easy to grab when you crochet.
Holding your hook takes some practise too. I like to hold mine like it’s a pencil, but there are (again) many ways. You’ll probably even change technique as you get more practise.
How to chain stitch (ch)
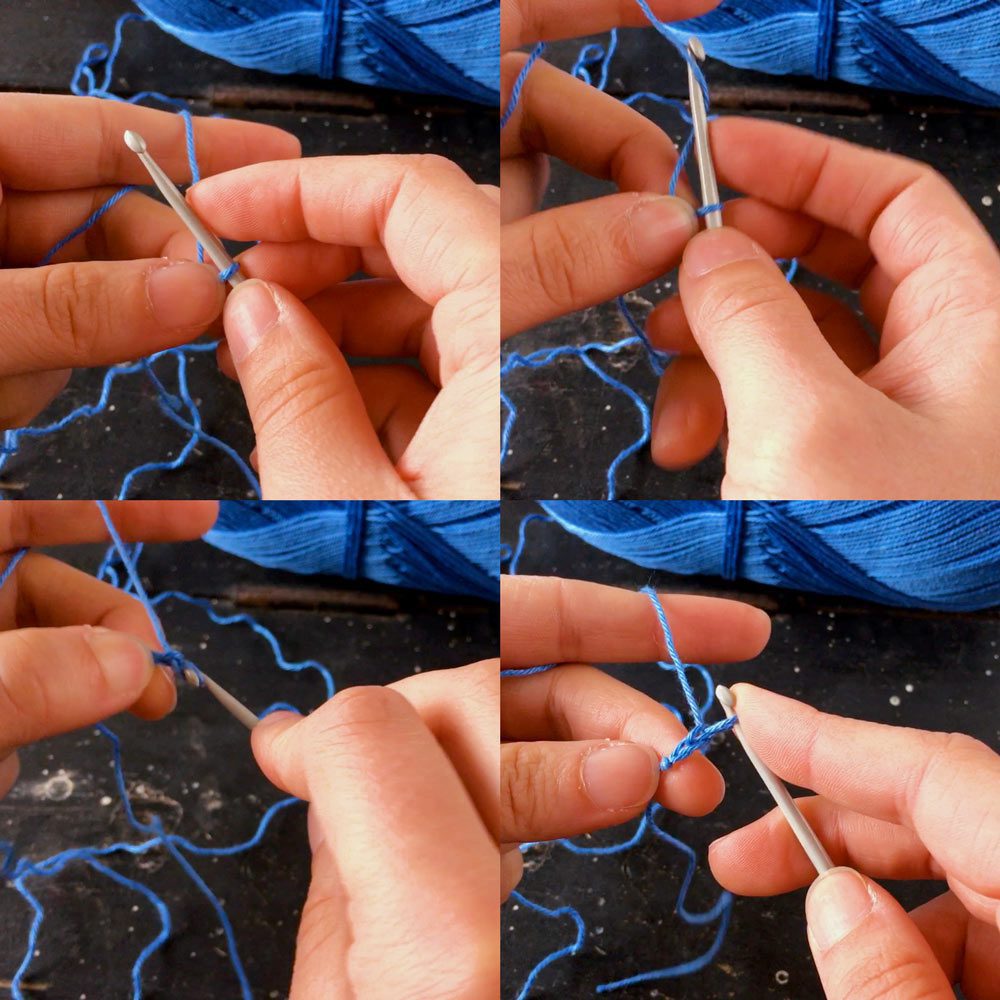
Now it’s time to practise your yarn & hook holding. Use your right hand to hold your hook, and your left to control the yarn. As there is only one little loop on the hook at this point, I like to pinch the end in place. This adds to the tension and helps control the hook.
To chain, grab the yarn with the end of your hook, and pull this yarn through the loop you have on your hook. That’s one chain. Keep repeating until you feel comfortable controlling both hands and the stitches.
When the very first stitches in a project are chains (which is most of the time) they are called a foundation chain. Many patterns say “ch [number here]” before they even start on “Row 1”.
Watch at 01:14
How to count chain stitches in crochet
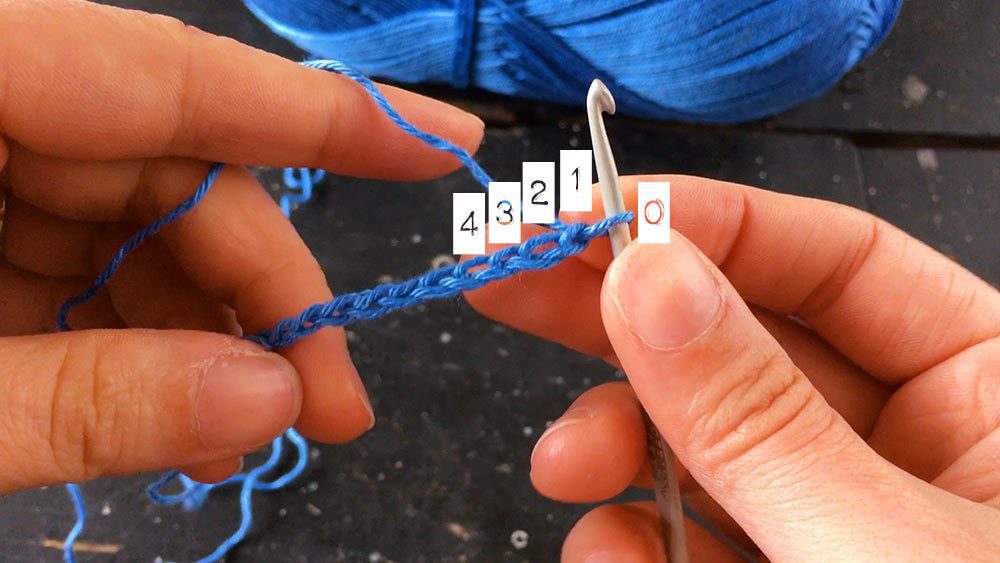
In my video I have made an example “foundation chain” of 10 chains. If you lose count of how many chains you have made, they are easy to count. Each “v” or “u” like shape is one chain, and you count them backwards from the hook. The loop that is on the hook itself does not count. That’s 0. The next v/u is 1, then 2, 3, etc until you get to the end and there’s nothing but the tiny knot and tail left.
How to crochet in a row (DC/SC)
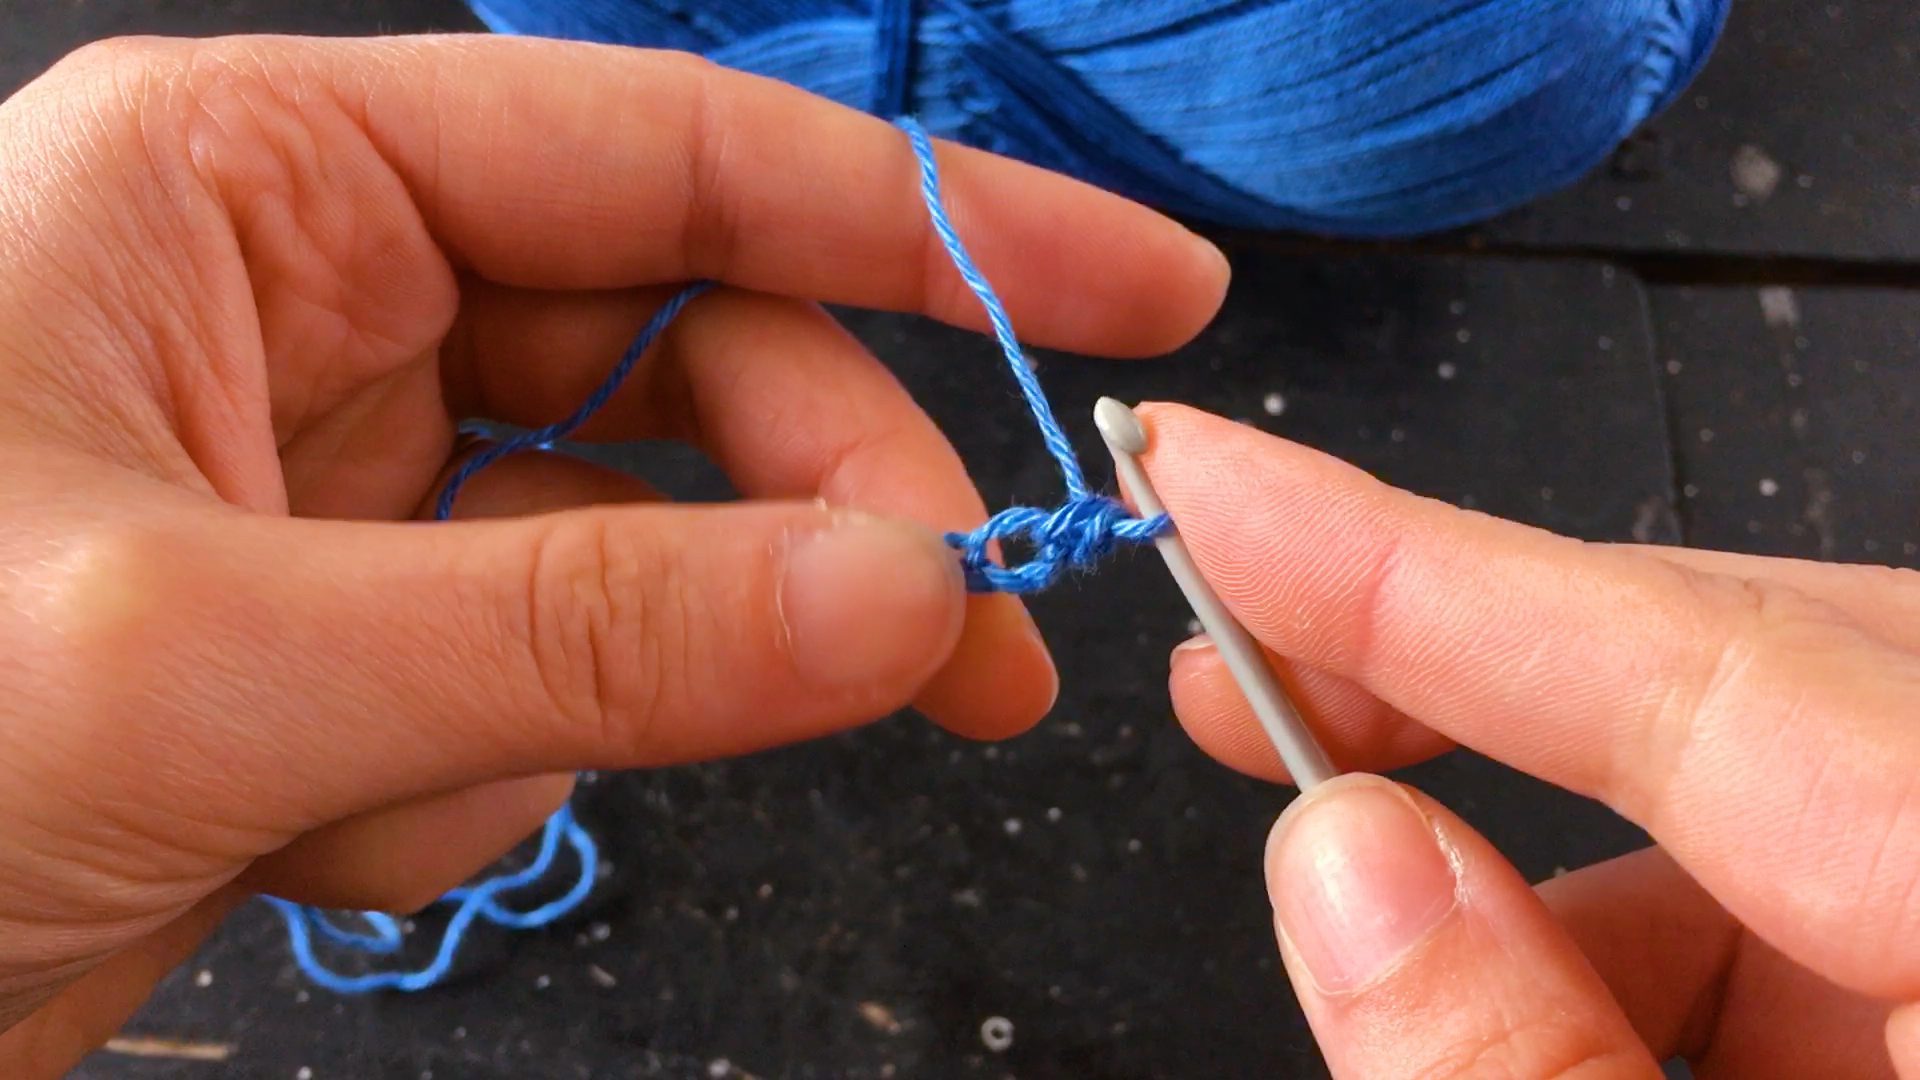
Watch how to double crochet (US single crochet)
at 01:39 in the Crochet 101 video
So you made a chain. Let’s pretend your chain is 10 chains long like mine. Where does the row go? You make this by crocheting into the chain. You can work your double crochet into the nearest chain to the hook, the 1st chain, or into the 2nd chain from the hook. It actually doesn’t matter when it’s double crochet.
Push your hook into the stitch or gap you need to work into. Wrap the yarn around the hook like in the little video above (called a yarn over) and pull the yarn through the stitch. You’ll now have what’s called “two loops on hook” – literally, there’s two loops. Yarn over to grab the yarn again, and pull it through BOTH loops on the hook. That’s one double crochet (US single crochet).
Just keep practising until it makes sense. I find working into the foundation chain and the second row are the trickiest, even now after years of crochet. Making new crochet stitches is easier when there’s more of the project to hold and keep things in place.
ADVANCED CROCHET TIP
You clever people will notice I skipped the nearest chain, and crocheted into the SECOND chain from the hook. So what’s the difference between 1st or 2nd chain? You can count the 1st chain as a “turning chain” and work the first double crochet in the 2nd chain. More on that below, as this relates to all your rows. In Crochet 102, we’ll talk about stitch height and how the foundation chain usually needs to include the turning chain too, but let’s talk about what we need to know for now.
How to work rows, AKA what’s a turning chain? (tch)
So you made a row! Heck yes! Now what?
So at the start of each row, you need to start the next row by chaining one or more stitches. These are turning chains. If you simply start to create the new row without this chain, you will distort the end of your rows by stretching them out of shape. This is especially noticeable with the bigger stitches. (Like treble crochet. We’ll cover those in Crochet 102.)
The number of stitches in your “turning chain” depends on what crochet stitch you are using. This refers to the stitch “height”. Double crochet has a “height” of one chain. So at the beginning of the row, you chain 1 before working the rest of the row as double crochet.
The turning chain, whether 1 for double crochet rows or 3 for treble crochet rows, counts as the first “stitch” of the row. So if you have a row of 10 double crochet, it will be made of 1 chain and 9 actual double crochet.
ADVANCED CROCHET TIP
So “i” before “e” except after “c”, right? When you make turning chains, this chain normally counts as the first stitch in the row. But thing is, double crochet is quite dense. So a chain stitch at the start of the row can look a bit empty. One trick advanced crocheters do is chain 1, AND work a dc into the right-most gap. This can make the edges more even and full. The trick is to remember your chain doesn’t count as the first stitch in this instance, so make sure you’re keeping count and not making your rows longer and longer!
Where does the crochet stitch go in a new row?
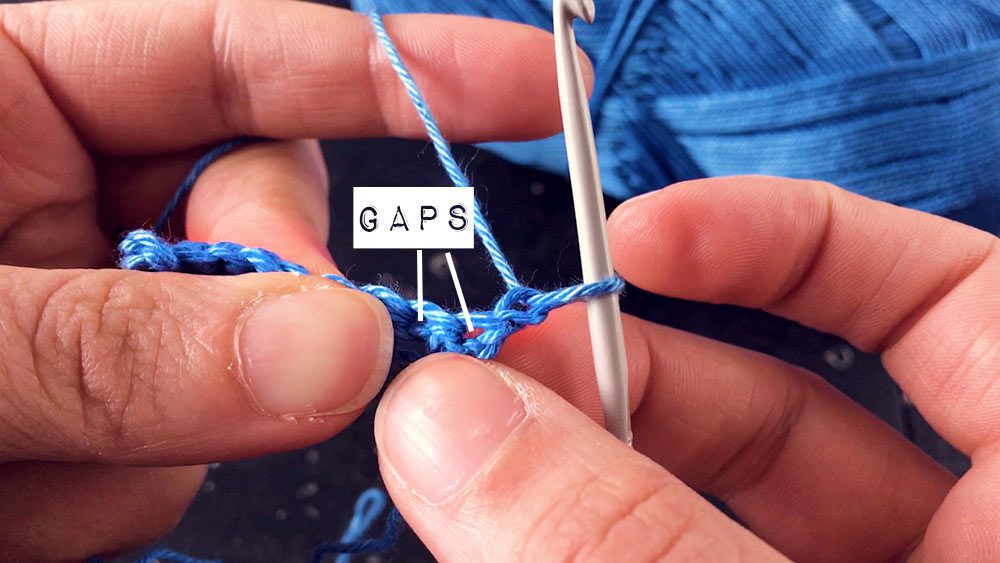
Good question! At this point, I just worked wherever I could poke the hook. Get really hands on with the cool crochet fabric you’re making. Don’t overthink it! The more you play the more it makes sense.
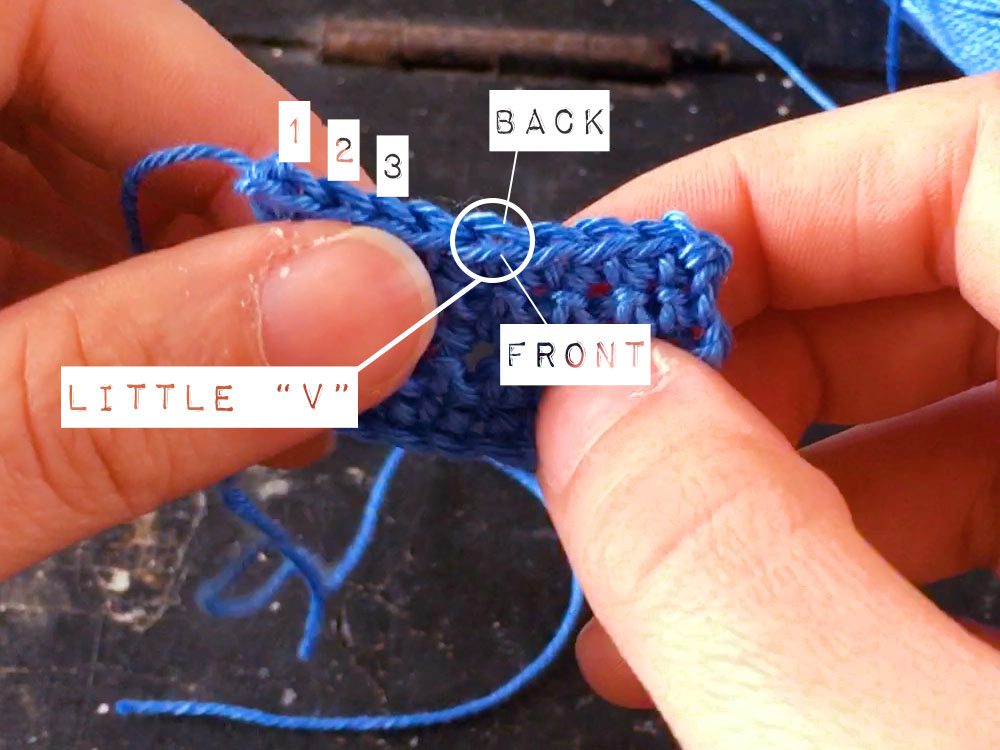
The proper spot is the little gap right near the top of the previous stitch. From above, the previous row looks like bunch of connected Vs. Underneath these V loops, you’ll see a tiny gap. This is where the hook goes.
The key is to put the hook through the gap straight on, so you go through both sides of the V.
Also, these Vs are how you count your crochet stitches. When you view them from above and count along the top of the work, you’ll know how many DC you’ve made so far in that row. Counting Vs works for any stitch type, and larger crochet stitches have a stem-like appearance which is even easier to count.
ADVANCED CROCHET TIP
When you work a stitch into the gap underneath the Vs, you are working through “both loops”. You’ll find references in more intermediate patterns about working in the “front loop only” (FLO) or the “back loop only” (BLO). This is literally either the front-facing half of the little V you can see, or the back-facing half. When you work through only one side instead of going clean through the gap, it changes how the pattern looks.
There are UK and US crochet terms???
Oh yes. As you’re learning crochet online you NEED to know there are different “languages” in crochet. Otherwise you’ll find yourself confused when you find a pattern that’s not using the same set of terms you do. I nearly gave up crochet when I wasted hours on a pattern only to realise UK double crochet is NOT US double crochet. Not even close.
The same name can be a completely different stitch depending on the region. Here’s a quick translation table:
| UK crochet terms: | US crochet terms: |
| chain (ch) | chain (ch) |
| slip stitch (sl st) | slip stitch (sl st) |
| double crochet (dc) | single crochet (sc) |
| half treble crochet (htr) | half double crochet (hdc) |
| treble crochet (tr) | double crochet (dc) |
| double treble crochet (dtr) | triple crochet (tr) |
My advice? Learn & prefer one set of terms. US terms are, globally speaking, more common online & in magazines. I learned to crochet from UK mags so I know the UK terms and they just make sense to me. Pick which group of terms makes sense to you.
Point is, just pick. Then just be aware not all DCs are DCs and not all TRs are TRs. I’ve made an easy guide on how to tell if a crochet pattern uses UK or US terms. (If you’re having problems, shoot me a comment – I’d love to help!)
So I made some rows, what do I do now? AKA Finishing

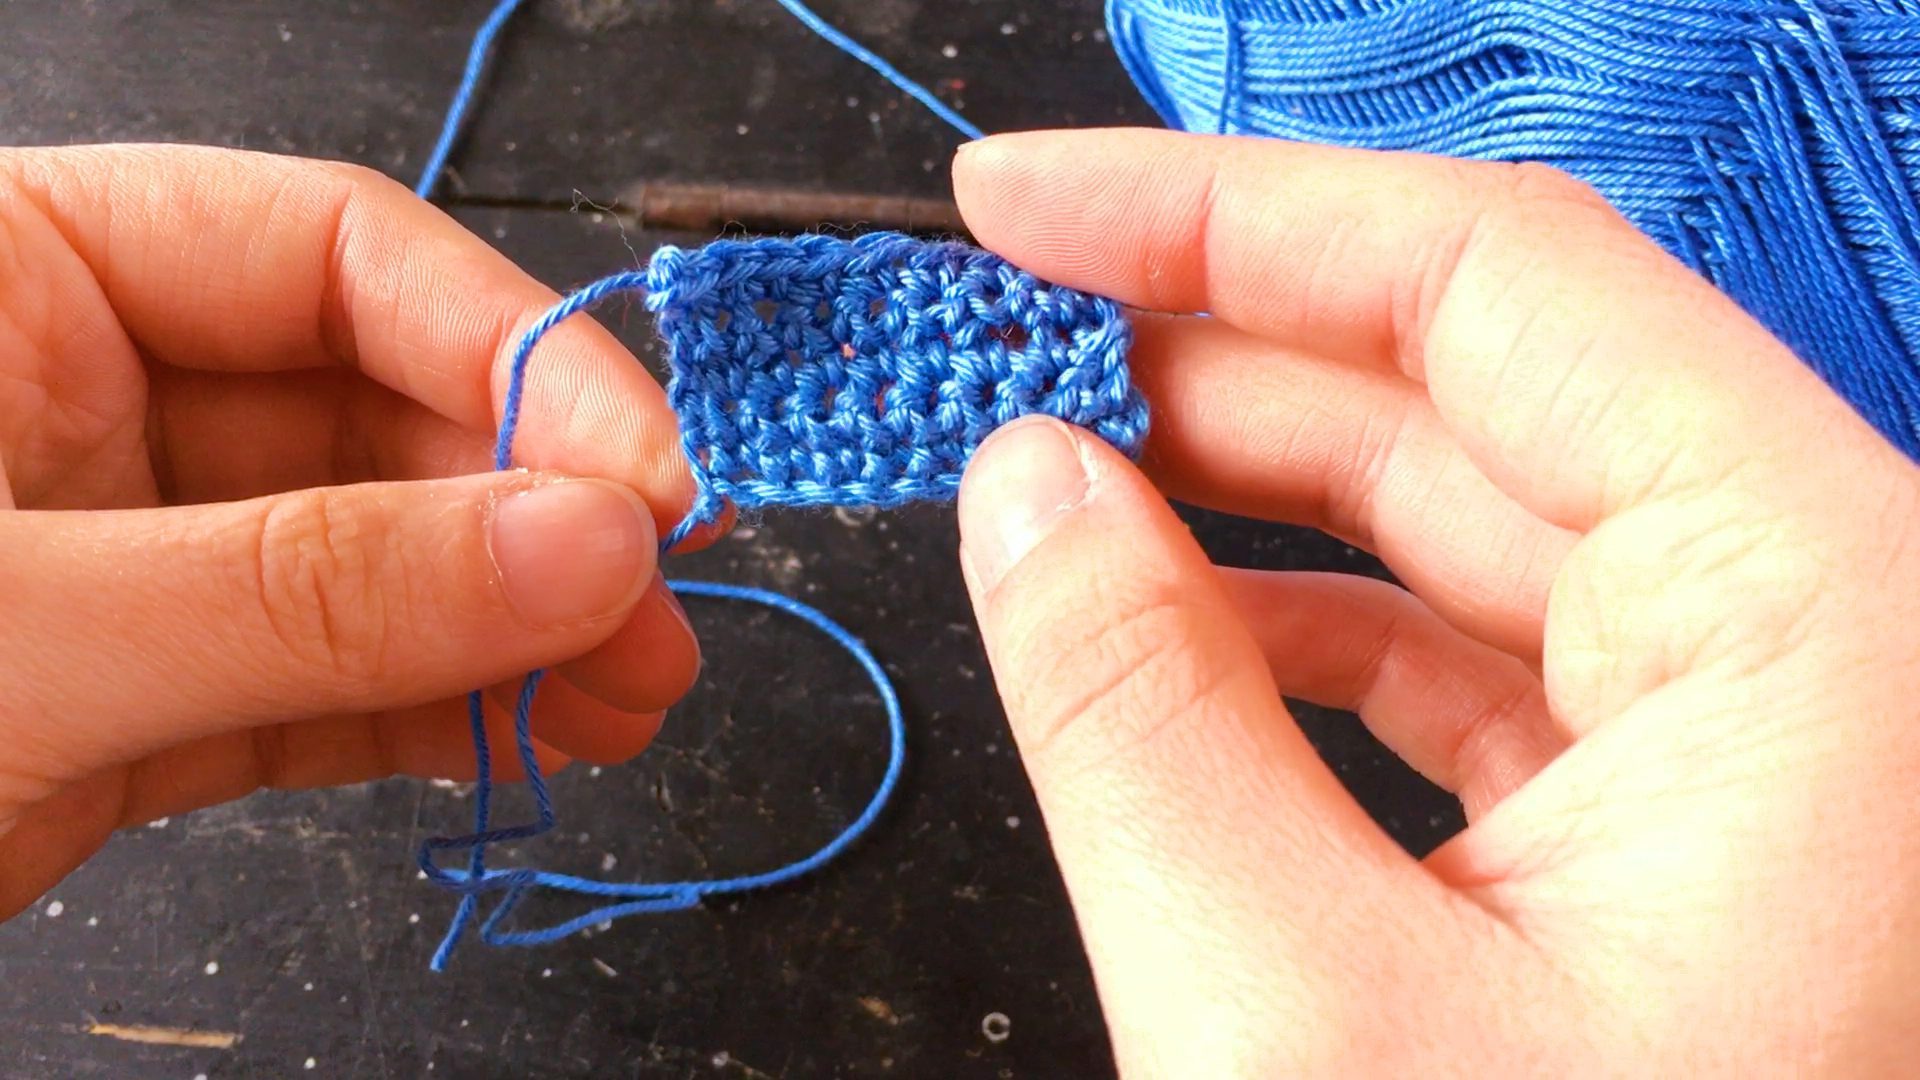
Right. So you’re done making rows, and want to get on with some pattern making. From the bottom of my heart I recommend you keep your first practise swatches. This is the first step of a very exciting journey, and it’s great for nostalgia.
But I’m getting ahead of myself. To keep your crochet intact, you need to bind off the yarn. This sounds complicated but it’s the easiest step in the whole thing. Pull your working loop loose, so it’s big enough to poke a couple fingers through. Put your hook to one side. Then, cut the working yarn with a few inches spare, and pull that yarn through the loop. Pull to tighten, and your work won’t unravel!
To make a tidy finish, use a yarn needle to weave the yarn tails into the work. If you just cut them close to the ends, your work will unravel as it loosens itself up. Just weave an inch or two of yarn through the crochet stitches, and cut. Try to leave the cut end close to the work so it doesn’t poke out.
And that’s it! Your masterpiece is complete!
5 FREE patterns you can try now
With just these techniques, there are thousands of projects you could try. And lucky for you, you’re alive when the internet is a thing so you can find a gazillion free crochet patterns online. These five crochet patterns are amazing AND you can make them with just the techniques you’ve learnt by following this post:
- DIY folded crochet potholder (can never have too many potholders)
- DIY crochet mini basket (super sweet! Perfect for t-shirt yarn)
- DIY crochet braid bracelet (this is a great stashbuster)
- DIY simple crochet bunting (a true classic!)
- DIY fast crochet baby blanket (let the yarn do the talking)
Happy hooking!
Questions? Comments? So frustrated you could chuck everything in the bin? Comment or DM me @craftingfingers and I’ll help however I can!
Lots of crafty love,
![]()
P.S. Make sure to subscribe to the Crafting Fingers YouTube channel to get the next lesson, Crochet 102, when it goes live. I’ll be posting DIY videos (crochet, sewing, and more) every Tuesday.
P.P.S. If you missed the Crochet 101 video, here it is again:



[…] at Crafting Fingers has a very in depth guide to learn the basics of crochet. The 5 minute video would make a great start and then with a cup of […]
Hi Anna. Great tutorial :) Our readers will love this! Have included it in our Crafty Like Granny weekly Craft roundup. https://craftylikegranny.com/love-handmade :) Cheers Emily